To fix a rust spot on your car, the process involves sanding the area to bare metal, treating it with a rust converter, and then priming, painting, and clear-coating the spot. For minor surface rust, this is often a manageable DIY project requiring sandpaper, automotive masking tape, degreaser, primer, color-matched paint, and clear coat. However, if the rust has created a hole (penetrating rust), it requires professional repair involving cutting and welding new metal to ensure structural safety.
You saw it—that first brownish-orange speckle on your car’s paint. Seeing a rust spot can be worrying, but catching it early is the most important step. A small rust problem is something you can solve, but if you ignore it, it will always get worse.
This guide will show you how to properly fix a rust spot on your car. We'll cover how to identify the type of rust, what tools you need, and the step-by-step process for a lasting repair right here in the Monterey Bay Area.
Why You Should Never Ignore a Rust Spot
It's a sinking feeling, spotting that orange bubble or brownish speckle on your car's paint. But by noticing it, you've already taken the most important step. A small rust spot is a problem you can absolutely solve, but an ignored one will always get worse.
Rust is more than a cosmetic issue; it's a chemical reaction that is literally eating away at your car's metal panels. It usually begins with a small chip or scratch in the paint. Once steel is exposed to moisture and air, corrosion starts.
If left untreated, that corrosion spreads under the surrounding paint. This creates hidden damage that is much harder and more expensive to fix. You can see how small issues often lead to bigger problems by reading our post on why a repair estimate can change after work begins.
How to Identify the Type of Rust on Your Car
Before you grab any tools, you need to know what kind of rust you’re dealing with. Identifying the rust type is the difference between a simple weekend project and a serious problem that needs a professional’s touch.
Don't underestimate this common issue. AAA research found that rust repairs caused by road de-icers and salt cost U.S. drivers an estimated $3 billion annually (AAA, 2013). This highlights how quickly a small spot can turn into a major expense.
Let's break down the types of rust you might see.
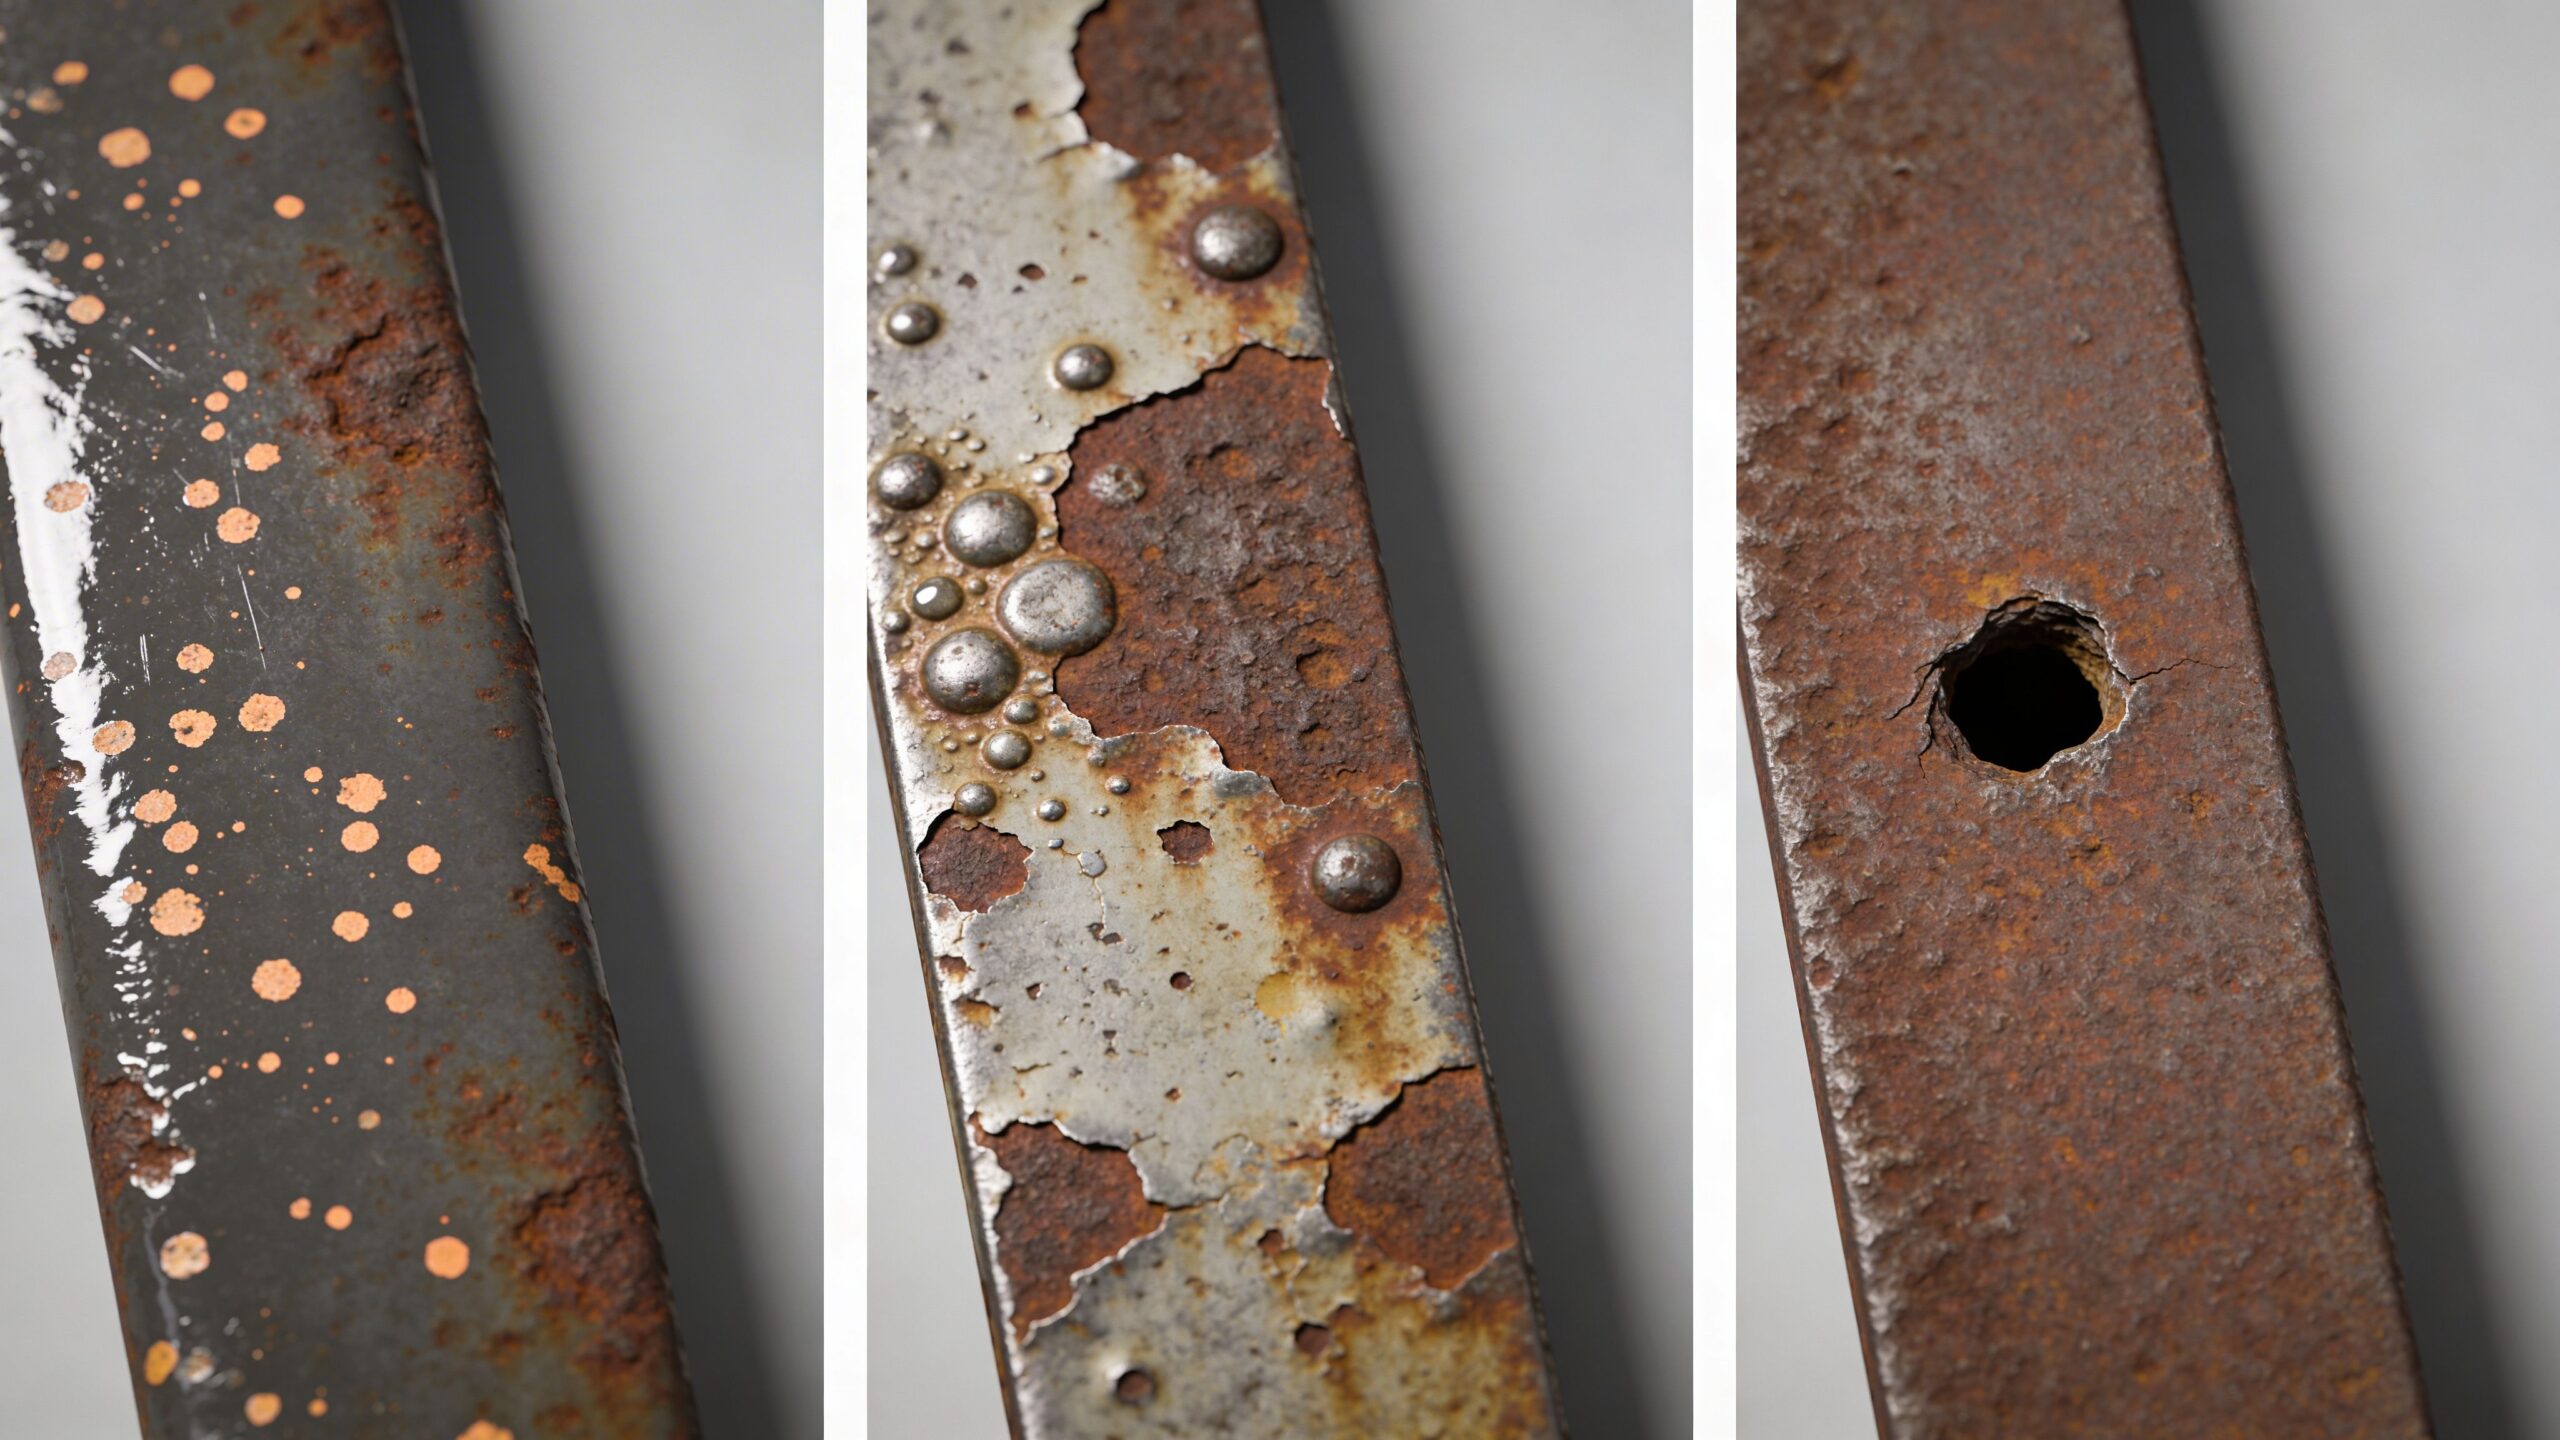
Surface Rust: The Early Warning
This is your best chance to stop rust easily. Surface rust looks like tiny, brownish-orange specks that seem sprinkled onto your paint. It often appears where a rock chip or scratch has broken the clear coat, letting moisture reach the bare metal.
Check high-impact areas like your hood, roofline, and the panels behind your wheels. At this stage, the rust hasn't penetrated the metal, making it a perfect DIY repair.
Scale Rust: The Problem Is Spreading
If surface rust is left alone, it becomes scale rust. You'll see the paint start to bubble, flake, or blister around the original spot. This bubbling is a clear sign that corrosion has started to dig into the metal panel itself.
If you sanded down a blister, you would find a rough, pitted surface. The rust is no longer just on top; it's creating "scale" and weakening the steel. A DIY repair is still possible but requires more aggressive sanding.
Penetrating Rust: The Red Flag
This is the stage you want to avoid. Penetrating rust, or "rot," means the corrosion has eaten a hole straight through the metal. You'll often find this where moisture gets trapped, like in rocker panels, floor pans, and trunk floors.
If you can see daylight through a rust spot, it's rot. If the metal feels soft or crumbles when poked gently with a screwdriver, you have penetrating rust. This is a structural problem, not just cosmetic.
At this point, the car needs to go to a professional collision shop like Searson Collision Center. The only safe fix is to cut out the rotted metal and weld in a new, solid piece to restore the vehicle's structural integrity.
Deciding Between DIY and Professional Rust Repair
Still not sure if your rust problem is a weekend task or one for the experts? This table breaks it down.
| Rust Type | DIY Feasibility | When to See a Pro |
|---|---|---|
| Surface Rust | High. Perfect for a home repair with basic tools and materials. | If the spot is very large or on a complex body line. |
| Scale Rust | Medium. Possible for an experienced DIYer, but requires more effort and skill. | If you're not confident in your ability to properly sand and prep the pitted metal. |
| Penetrating Rust | None. This is a structural and safety issue. | Immediately. The panel needs to be professionally cut, welded, and repaired. |
Gathering the Right Tools and Materials for the Job
There’s nothing worse than starting a project only to realize you’re missing a key item. Proper preparation begins with having everything you need ready to go. A good rust repair is all about the prep work.
The Grunt Work: Rust Removal and Surface Prep
This is the most important part of the job. Your goal is to create a perfectly clean and smooth foundation for the new paint. If you cut corners here, the rust will come back.
Here’s what you’ll need for the prep phase:
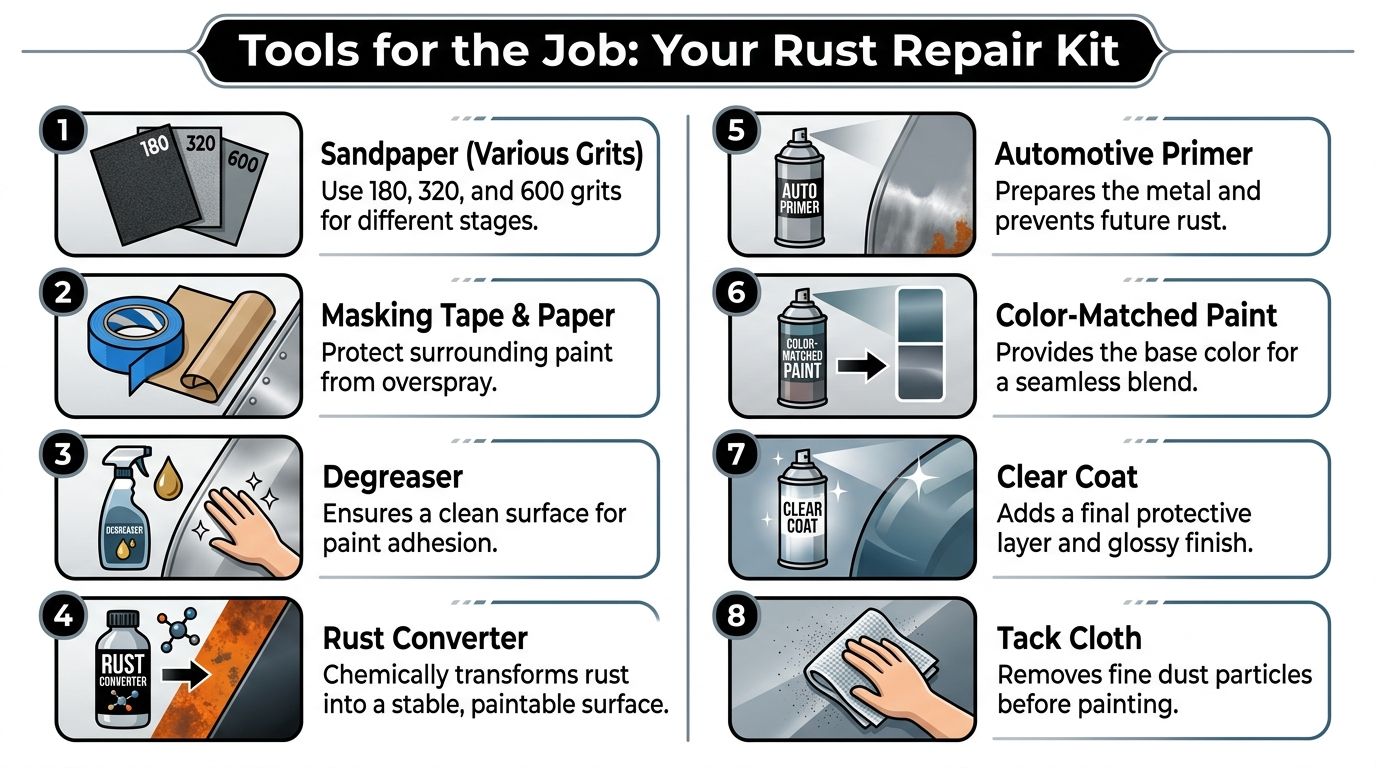
- Sandpaper (Multiple Grits): Start with an aggressive 180-grit to remove rust and bubbled paint. Then switch to a finer 320-grit to smooth the area and feather the paint edges.
- Automotive Masking Tape & Paper: Use automotive-grade tape for sharp lines and to protect your car's finish from dust and overspray.
- Wax and Grease Remover: This is essential. It removes oils and silicones that can ruin your new paint.
- Tack Cloth: This slightly sticky cloth picks up the last tiny dust particles right before you spray primer, ensuring a smooth finish.
Choosing Your Weapon: Rust Treatment Options
Once you've sanded down to clean, bare metal, you must treat it to prevent rust from returning. You have two main options.
A rust remover is a gel that chemically dissolves any remaining rust, leaving pristine metal. The other option is a rust converter, a special primer that transforms rust into a stable, paintable surface. For most DIY jobs, a quality rust-converting primer is the most straightforward choice.
Building It Back Up: Primer, Paint, and Clear Coat
Now it's time to make it look new again. This is a multi-layer process, and each layer is critical. You can learn more on our auto dent and scratch removal services page.
Your refinishing kit must include:
- Automotive Primer: This protects the bare metal and provides a uniform surface for the color coat.
- Color-Matched Automotive Paint: Find your car’s paint code on a sticker inside the driver’s side door jamb. An auto parts store can mix an aerosol can based on that code.
- Automotive Clear Coat: This final layer provides gloss and protects the color from UV rays and scratches.
A Step-by-Step Guide to Repairing Surface Rust
Let's walk through fixing surface rust—the kind you catch early. With patience, you can achieve a nearly invisible repair that stops corrosion. The biggest mistake is rushing; a good repair depends on methodical prep work.
Step 1: Clean and Degrease the Area
Before you start sanding, the entire area must be spotless. Wash the rust spot and a six-inch border around it with car soap and water, then dry it completely.
Next, use a wax and grease remover on a clean microfiber towel. This step removes invisible oils and contaminants that will ruin your new paint. Do not skip it.
Step 2: Mask Off the Repair Area
Use automotive masking tape to create a border about two inches outside the rusted area. Cover a larger section with masking paper to protect it from sanding dust and overspray. This simple step saves you from a much bigger cleanup job later.
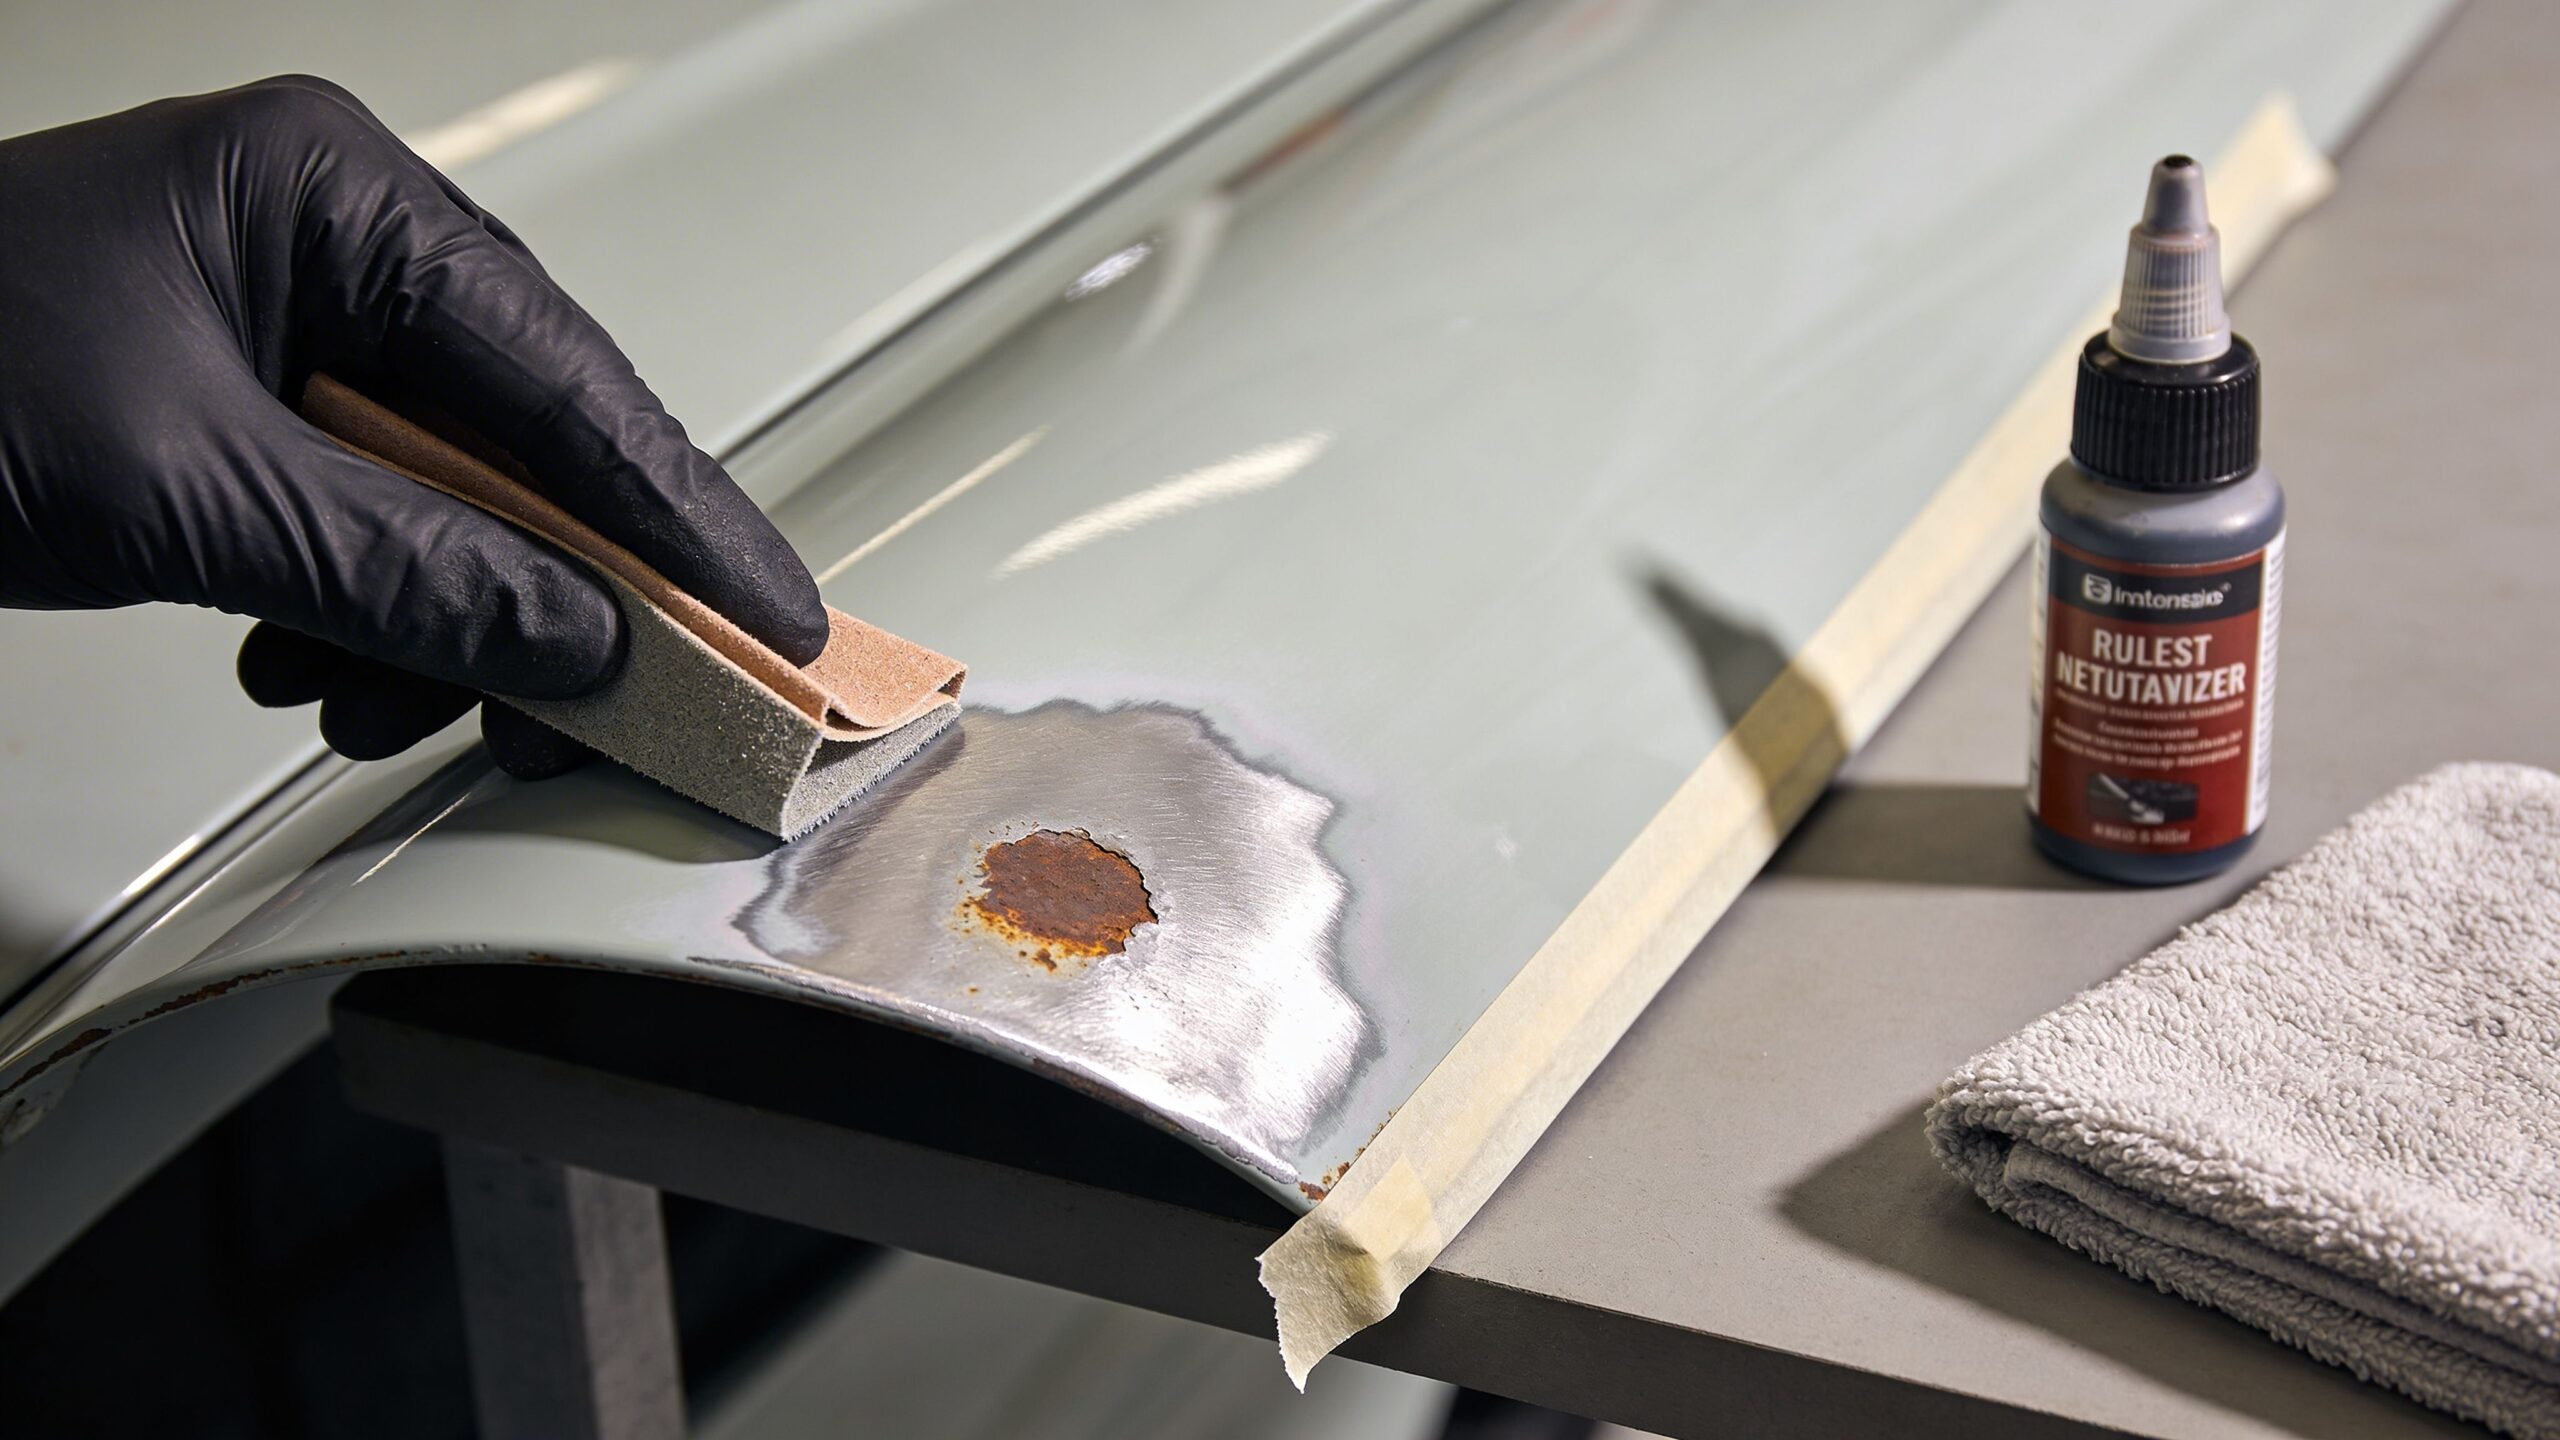
Step 3: Sand Down to Bare, Shiny Metal
Now it's time to sand. Start with aggressive 180-grit sandpaper to remove all visible rust and bubbled paint until you see clean, shiny metal. You must sand past the edges of the visible rust, as corrosion often creeps under the surrounding paint.
Once all rust is gone, switch to a finer 320-grit paper. Use this to "feather" the edges where the bare metal meets the factory paint, creating a smooth transition. Wipe the area with degreaser and a tack cloth to remove all dust.
Step 4: Treat the Metal and Apply Primer
Exposed metal needs immediate protection. Apply a thin coat of rust-converting primer directly to the bare metal. This treats the surface and gives the next layer of primer something to adhere to.
After it dries, apply two or three light coats of a high-build filler primer. This type of primer fills tiny sanding scratches. Wait 10-15 minutes between each coat.
Step 5: Apply Color and Clear Coat
After the primer has fully cured, lightly wet-sand it with 600-grit sandpaper until it’s perfectly smooth. Clean the area one last time with degreaser and a tack cloth.
Spray your color-matched paint in very light, sweeping motions, keeping the can 10-12 inches from the surface. Apply several thin coats instead of one heavy one. Studies on modern coating systems show they are highly effective at preventing further corrosion when applied correctly (PMC, 2022).
Once the color is dry, apply two or three medium coats of clear coat. Let it cure for at least 24 hours before washing or polishing. For a perfect finish, you can bring it to a professional for final blending, a service we provide with our auto paint and refinishing services in Salinas.
Common DIY Mistakes and When to Call a Professional
Knowing what not to do is just as important as knowing the right steps when you fix a rust spot on your car. Many well-intentioned DIY jobs end up making the problem worse. The most common mistake is not sanding enough—you must get down to clean, shiny metal.
Another frequent error is skipping the degreasing step. Skipping a thorough cleaning with a wax and grease remover will cause your new paint to peel or develop "fisheyes." Proper preparation is everything.
Knowing When to Call a Professional
A small patch of surface rust is a great DIY project. However, some situations absolutely require an expert.
- Rust Holes: If rust has eaten a hole through the metal, it's penetrating rust. This is a major red flag that requires professional cutting and welding.
- Frame Rust: Any corrosion on your vehicle’s frame or structural members is a serious safety concern. Learn more about how we handle this in our guide to auto frame and structural repair in Salinas.
- Paint Matching: Modern car colors are tricky to match with a spray can. For a truly invisible blend, you need the specialized equipment of a professional painter here in the Monterey Bay Area.
Rust doesn't just look bad; it hurts your car's value. A botched repair can be just as damaging. You can discover more about how rust impacts car value on Motorway.co.uk to see why a quality job is a smart investment.
FAQ: Your Top Questions About Car Rust Repair
We get a lot of questions about rust from car owners here in Salinas. To help, we've answered the most common concerns we hear at the shop.
Q: How much does it cost to fix a small rust spot on my car?
A: A DIY kit for a small spot might cost $50 to $100. A professional repair for a straightforward spot typically runs from $300 to $700, depending on the size, location, and paint complexity. If the rust has gone through the metal, the cost will be higher.
Q: Can I just paint over a rust spot?
A: No. Painting over rust is like putting a bandage on a serious wound. The corrosion will continue to spread underneath, and the new paint will bubble and flake off, leaving you with a bigger problem. You must completely remove all rust down to clean, bare metal first.
Q: How can I prevent my car from rusting in the first place?
A: Wash your car regularly, including the undercarriage, to remove salt and grime. Apply a quality wax twice a year for an extra layer of protection. Most importantly, use a touch-up pen to fix paint chips and scratches as soon as you see them to prevent rust from starting.
Q: Will my car insurance cover rust repair?
A: Usually, no. Standard auto insurance policies view rust as a maintenance issue from normal wear and tear, which is not covered. The only exception is if rust forms as a direct result of damage from a covered accident. We can help you navigate this on our auto insurance assistance in Salinas page.
Q: Is a little bit of rust on my car's frame a big deal?
A: Yes, it is a huge deal. Rust on a body panel is a cosmetic issue, but rust on the frame is a critical safety issue. The frame is your car’s skeleton, and rust weakens its ability to protect you in a crash. If you see any rust on your car's frame, have it inspected by a professional immediately.
Q: How long does a professional rust repair take?
A: The timeline depends on the severity. A small surface rust repair might take 1-2 days, including paint curing time. A larger repair involving scale rust could take 2-3 days. If there's penetrating rust that requires cutting and welding, it could take a week or more.
Q: Does living near the coast in Monterey County make my car rust faster?
A: Yes, it absolutely does. The combination of salty air, morning dew, and fog creates a perfect environment for corrosion. That's why regular washing and waxing are even more important for vehicle owners in Salinas and the surrounding coastal communities.
If you need help to fix a rust spot on your car, or if it looks too intimidating for a weekend project, the team at Searson Collision Center is here to help. Call us for a free estimate at (831) 422-2460 or visit our shop at 488 Brunken Ave, Salinas, CA 93901. Our hours are Monday–Friday, 7:00 AM–5:00 PM.
Sources
- AAA. "Road Salt Causes $3 Billion in Vehicle Rust Damage Annually." 2013. https://newsroom.aaa.com/2013/02/road-salt-causes-3-billion-in-vehicle-rust-damage-annually/
- National Center for Biotechnology Information (PMC). "Research on the Anti-Corrosion Performance of Graphene Modified Waterborne Epoxy Zinc-Rich Coating." 2022. https://pmc.ncbi.nlm.nih.gov/articles/PMC9105723/